 Hello again friends to another baking blog. I have been trying to make each recipe a bit harder than the last or at least more out of my comfort zone. And this week I did just that. A little while ago I went to a restaurant and had a slice of Oreo cheesecake for dessert, and ever since that night I have been going cheesecake crazy. I have been constantly craving it so I thought I would just go ahead and try to make it. Before I set my mind on it, I researched how to actually make a cheesecake to check out the level of difficulty. I came across an Oreo cheesecake recipe that was rated pretty high by users and didn’t seem too complicated. This recipe had a total of 6 ingredients and 6 steps.
 After reading the minimal amount of ingredients I asked myself why I never made a cheesecake before? What was I doing with my life? It seemed too good to be true. The first thing that I did was make the Oreo crust which was just crushed Oreo’s and melted butter. This took me about 5 minutes to make and prepare in the pan. Next was to mix the cream cheese with the sugar. This is also where I had a slight mental breakdown trying to figure out how a mixer works. After spilling and mixing half of my cheesecake batter all over the kitchen I used my one help line to call my mom to walk me through how to properly use a hand mixer. After having my pride crushed just a little I resumed with my recipe and added the rest of the ingredients then set it into the oven for about 35-40 minutes.
Aside from the mixer incident, the hardest part of this recipe for me was knowing when to take the cheesecake out of the oven. One recipe that I looked at said that it should be golden brown and semi firm throughout, another said that the middle ring of it should jiggle, so honestly I don’t know. After the 35 minutes it still seemed like it needed more time so I put it back into the oven for another 5, but when I came to check on it after the 5 minutes it didn’t seem like anything changed, so I just took it out. After removing it from the oven, I set it on the counter for 3 hours to cool and set.
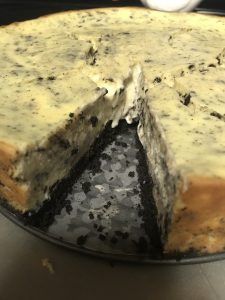 Then the moment of truth came when I dipped my knife into the cake to cut a piece. Right when I cut down the center of the cheesecake it seemed to sink right in and reveal a gooey center. Now, I am no cheesecake expert but I am sure that cheesecakes do not ooze, so this meant that the cheesecake is either under-baked or still needs time to set or both (which would be a big bummer). I was almost tempted to fire up the oven again but I know baking doesn’t typically work that way. Reluctantly I continued to cut a slice to analyze the taste and overall flavor. It wasn’t too sweet which was nice and the Oreo crust offered a nice bitterness to it. It wasn’t bad! I would give it a solid 6.5/10.
I am hoping overnight it will set more and the center won’t stay gooey (i’ll update you next week). I was definitely disappointed in how this week’s baking went, but after reflecting on today’s events I came to a realization. Baking is like my experience with teaching in a classroom this year, no matter how prepared you feel, sometimes things won’t work out, and that’s okay because it is a part of learning. It is impossible to expect yourself to be amazing and an expert at something when you haven’t done it before. It is a learning curve, but with a little time and effort things will start to become easier.
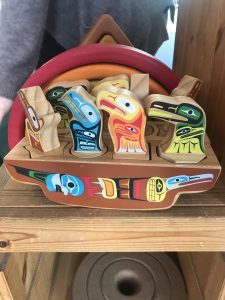 For this week’s class we met up on Wednesday at George Jay Elementary to learn about inquiry based learning in Rebecca Bathurst’s kindergarten classroom. Before this class I was familiar with Rebecca Bathurst’s work with her students from following her Instagram page after a teacher had recommended it to me. I have been following and reading what she has been doing with her latest inquiry on dinosaurs and have been amazed. From going outside and exploring the possibilities of habitat’s to going as far as to create dinosaur eggs she has truly taken on her students inquiry and is creating a multitude of learning possibilities.
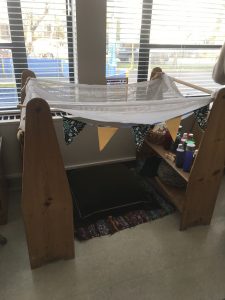 One thing that stuck me upon entering Rebecca’s classroom was how beautifully she had decorated it. Last semester one of the classes that I took was literacy in the Elementary classroom instructed by Jodi Streelasky. In this class, one of the things that Jodi was very passionate about was the importance of classroom walls and how too much commercialized materials and colours could over stimulate a child and could affect their learning ability. Jodi showed many examples of classrooms that were inspired by Reggio Emilia that use natural materials, neutral colours and natural sunlight, and explained all the research behind the benefits that these environments have for students. Right when I walked into Rebecca’s classroom it reminded me of all the pictures that I was shown last semester and was instantly inspired.
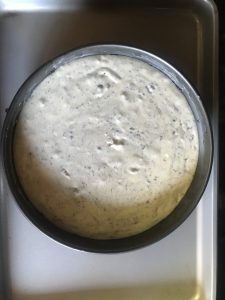
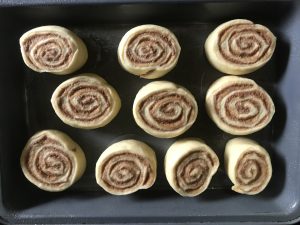 The first step in this recipe was to make the dough. This was the only part where I could go wrong in this recipe because of the yeast, if my milk was too warm or if my eggs and butter were too cold it wouldn’t work. I started by heating my milk up and then I sprinkled the yeast packet in and gave it a stir before adding the rest of my ingredients. After mixing all my ingredients, I kneaded my dough for 5 minutes and set it in a warm place to rise. This is the part where I crossed my fingers and hoped for the best. After 30 minutes I checked under the towel that was draped over top of the bowl and was instantly disappointed. It didn’t even rise an inch, or centimeter. I was just hoping that maybe it needed some more time to rise so I left it for another 20 minutes and then returned to the dough still in the same form. Absolutely heartbreaking.
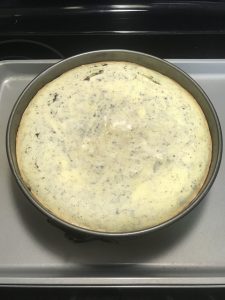
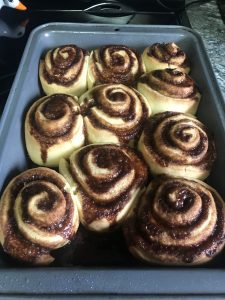 After putting so much time and effort into making this dough I thought I would still give it a shot so I rolled it out, spread my filling onto it then rolled it up and prepared it to bake. When it was all ready to go on my pan it looked really good honestly. The recipe recommended that it needed to be set aside to rise again before baking but we all know how that turned out the first time, so I just set it in the oven. After 17 minutes the cinnamon buns rose and were all yummy and golden brown. They looked really good and smelled amazing right out of the oven so I still had hope for them. After waiting for them to cool I topped them with my cream cheese frosting and called it a day.
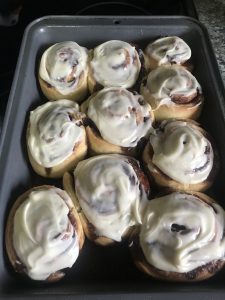 I would say these cinnamon buns ended up being passable. Not the best thing I have made nor the worst. They had really good taste and the filling and cream cheese was amazing but the texture was so off. They weren’t fluffy nor soft which are all the best things of a good cinnamon bun. I honestly don’t know where I went wrong but it must have been something with the yeast, maybe not letting it proof in the milk before adding the rest of my ingredients or not kneading it enough but this recipe was definitely harder than I thought it would be. Sadly I would rate these cinnamon buns a 6/10 because of the texture. I think next time I might try a different recipe and do more research on how to use active dry yeast.
 This is only my third night playing and learning this song so I still have practice to do, but my problem right now is that it doesn’t sound close to what the song is suppose to sound like. I think it could be because I am not picking the strings fast enough, but it also sounds like the chords are a little off which could mean that this song just doesn’t transfer over to ukulele very well.
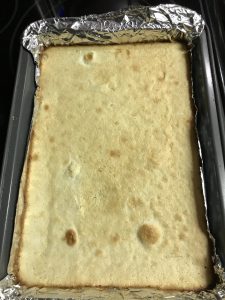
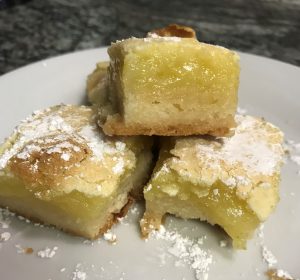 I am really building up my baking confidence because let me tell you, these lemon bars were very luscious. They had the perfect balance of sweet and tart that a lemon bar should have, the crust was baked perfectly and the filling was so yummy. I couldn’t have been happier with how these turned out and I would strongly say that I would give these lemon bars a 9.5/10. The only thing I would change for the future would be to make the crust a little thinner but they still tasted amazing.
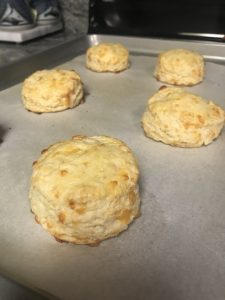
 During the baking process of my